DIY Gutter Guards: A Comprehensive Guide to Protecting Your Home
Maintaining clean and functional gutters is crucial for protecting your home from water damage. Clogged gutters can lead to a host of problems, including roof damage, foundation issues, and landscape erosion. While professional gutter cleaning services are an option, installing DIY gutter guards offers a cost-effective and long-term solution. This comprehensive guide will walk you through everything you need to know about DIY gutter guards, from understanding their benefits to selecting the right type and installing them yourself.
Why Choose DIY Gutter Guards?
Before diving into the specifics, let’s explore the advantages of opting for DIY gutter guards:
- Cost Savings: Professional installation can be expensive. DIY gutter guards allow you to save significantly on labor costs, paying only for the materials.
- Customization: You can choose the type of gutter guards that best suit your specific needs and budget.
- Flexibility: Install them at your own pace and convenience, without waiting for scheduled appointments.
- Home Improvement Satisfaction: Completing a home improvement project yourself can be incredibly rewarding.
Understanding the Different Types of Gutter Guards
The market offers a variety of gutter guard options, each with its own set of pros and cons. Understanding these differences is crucial for making the right choice:
Mesh Gutter Guards
Mesh gutter guards are one of the most popular and effective types. They consist of a fine mesh screen that prevents leaves, twigs, and other debris from entering the gutters while allowing water to flow through freely. They are generally easy to install and relatively affordable.
Pros:
- Effective at blocking most debris
- Relatively inexpensive
- Easy to install
Cons:
- May require occasional cleaning to remove fine particles that can accumulate on the mesh
- Some lower-quality mesh gutter guards may be prone to damage
Foam Gutter Guards
Foam gutter guards are made of porous foam that fits inside the gutters. They filter out debris while allowing water to pass through. They are easy to install, requiring no tools or fasteners.
Pros:
- Very easy to install
- Inexpensive
- Good for preventing large debris from entering gutters
Cons:
- Can become clogged with debris over time
- May not be as effective at blocking smaller particles
- Can be difficult to clean
Brush Gutter Guards
Brush gutter guards, also known as bottle brush gutter guards, consist of bristles that stand upright in the gutters. They allow water to flow through while trapping leaves and debris. Installation is simple; you just drop them into the gutters.
Pros:
- Easy to install
- Relatively inexpensive
- Good for preventing large debris from entering gutters
Cons:
- May not be as effective at blocking smaller particles
- Can become clogged with debris over time
- Bristles can degrade over time, especially in harsh weather conditions
Reverse Curve Gutter Guards
Reverse curve gutter guards, also called surface tension gutter guards, feature a curved design that directs water into the gutters while causing leaves and debris to fall off. They are generally more expensive than other types but can be very effective.
Pros:
- Highly effective at blocking debris
- Require minimal maintenance
Cons:
- More expensive than other options
- Can be more difficult to install
- May not work as well in heavy rain if not properly installed
Solid Gutter Guards with Slots or Holes
These gutter guards are solid pieces with small slots or holes that allow water to enter while keeping debris out. They are similar in performance to reverse curve gutter guards but may be slightly less expensive.
Pros:
- Effective at blocking debris
- Relatively low maintenance
Cons:
- Can be more expensive than mesh or foam gutter guards
- May require professional installation for optimal performance
- Small slots can become clogged over time
Choosing the Right Gutter Guards for Your Home
Selecting the best DIY gutter guards depends on several factors, including:
- Your Budget: Prices vary significantly between different types.
- The Type of Debris in Your Area: If you live in an area with many trees, you’ll need gutter guards that can handle large amounts of leaves.
- Ease of Installation: Consider your DIY skills and choose gutter guards that you feel comfortable installing.
- Maintenance Requirements: Some gutter guards require more frequent cleaning than others.
- Roof Type and Pitch: Some gutter guard types are better suited for specific roof configurations.
DIY Gutter Guard Installation: A Step-by-Step Guide
Before you begin the installation process, gather the necessary tools and materials:
- Gutter Guards: Choose the type you’ve selected.
- Ladder: Ensure it’s sturdy and stable.
- Gloves: Protect your hands.
- Safety Glasses: Protect your eyes.
- Measuring Tape: To measure the length of your gutters.
- Scissors or Utility Knife: To cut the gutter guards to size.
- Screwdriver or Drill: Depending on the type of gutter guards.
- Cleaning Supplies: To clean your gutters before installation.
Step 1: Clean Your Gutters
Thoroughly clean your gutters to remove any existing debris. This is crucial for the proper functioning of your new gutter guards. Use a garden hose and a gutter scoop to remove leaves, twigs, and dirt. Check for any leaks or damage and repair them before proceeding.
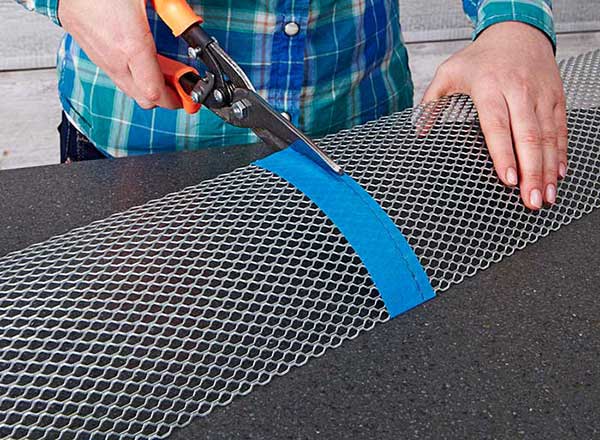
Step 2: Measure and Cut the Gutter Guards
Measure the length of your gutters and cut the gutter guards to the appropriate size using scissors or a utility knife. It’s better to cut them slightly longer than needed and then trim them to fit perfectly.
Step 3: Install the Gutter Guards
The installation process will vary depending on the type of gutter guards you’ve chosen. Here are general guidelines for each type:
- Mesh Gutter Guards: Slide the gutter guards under the shingles and attach them to the front lip of the gutter using screws or clips.
- Foam Gutter Guards: Simply insert the foam inserts into the gutters, ensuring they fit snugly.
- Brush Gutter Guards: Drop the brush gutter guards into the gutters, making sure they are evenly distributed.
- Reverse Curve Gutter Guards: Follow the manufacturer’s instructions for installation. These often require screwing the gutter guards to the gutters and sometimes to the fascia board.
- Solid Gutter Guards with Slots or Holes: Similar to reverse curve gutter guards, these typically require screws for secure attachment.
Step 4: Secure the Gutter Guards
Ensure that the gutter guards are securely attached to the gutters. This will prevent them from being dislodged by wind or heavy rain. Double-check all screws and clips to ensure they are tight.
Step 5: Test the System
After installation, test the system by running water from a garden hose onto the roof and into the gutters. Observe how the water flows through the gutter guards and into the downspouts. Make any necessary adjustments to ensure proper drainage. [See also: Gutter Cleaning Best Practices]
Maintaining Your DIY Gutter Guards
Even with gutter guards, occasional maintenance is necessary to ensure optimal performance. Depending on the type of gutter guards you have, you may need to:
- Remove Debris: Periodically remove any accumulated debris from the surface of the gutter guards.
- Clean the Mesh: If you have mesh gutter guards, use a brush or hose to clean the mesh and remove any fine particles that may have accumulated.
- Inspect for Damage: Regularly inspect the gutter guards for any signs of damage and repair or replace them as needed.
Troubleshooting Common Gutter Guard Problems
Even with careful planning and installation, you might encounter some common problems with your DIY gutter guards. Here are a few issues and their potential solutions:
- Clogging: If water is overflowing from the gutters, it could indicate that the gutter guards are clogged. Clean the gutter guards and downspouts to remove any obstructions.
- Sagging Gutters: If your gutters are sagging, it could be due to excessive weight from accumulated debris. Clean the gutters and consider reinforcing them with additional hangers.
- Icing: In cold climates, ice can build up on gutter guards and cause them to fail. Consider installing heated gutter guards or using de-icing products.
The Long-Term Benefits of DIY Gutter Guards
Investing in DIY gutter guards offers significant long-term benefits for your home:
- Reduced Maintenance: Less frequent gutter cleaning saves you time and effort.
- Protection from Water Damage: Prevents costly repairs to your roof, foundation, and landscaping.
- Increased Home Value: Well-maintained gutters contribute to the overall appearance and value of your home.
- Prevention of Pest Infestations: Clogged gutters can attract pests like mosquitoes and rodents. Gutter guards help prevent these infestations.
Conclusion: Protect Your Home with DIY Gutter Guards
Installing DIY gutter guards is a worthwhile investment for any homeowner looking to protect their property from water damage. By understanding the different types of gutter guards, choosing the right option for your needs, and following the proper installation procedures, you can enjoy the long-term benefits of clean and functional gutters. With a little effort, you can save money, protect your home, and gain the satisfaction of completing a successful DIY project. Take the time to research and plan your DIY gutter guard installation, and you’ll be well on your way to a healthier, happier home. [See also: Choosing the Right Gutter Material]
