How to Apply Gold Leaf to Acrylic Painting: A Comprehensive Guide
Adding gold leaf to your acrylic painting can elevate it from a simple artwork to a stunning masterpiece. The shimmering, reflective quality of gold leaf creates a luxurious and eye-catching effect. This guide provides a comprehensive, step-by-step approach on how to apply gold leaf to acrylic painting, ensuring a professional and long-lasting finish. Whether you’re an experienced artist or just starting, this process is accessible with the right materials and techniques. Understanding how to apply gold leaf to acrylic painting involves careful preparation, application, and sealing. This article will break down each step, offering tips and tricks to avoid common pitfalls and achieve spectacular results. Let’s delve into the detailed process of how to apply gold leaf to acrylic painting.
Understanding Gold Leaf and Its Types
Before diving into the application process, it’s crucial to understand the different types of gold leaf available. Gold leaf comes in two main forms: genuine gold leaf and imitation gold leaf (also known as Dutch metal or composition leaf). Genuine gold leaf is made from real gold and is available in various karats, each offering a slightly different color and luster. Imitation gold leaf, on the other hand, is made from a combination of copper and zinc, giving it a similar appearance but at a significantly lower cost.
- Genuine Gold Leaf: More expensive, doesn’t tarnish, available in different karats.
- Imitation Gold Leaf (Dutch Metal): More affordable, can tarnish and requires a sealant, made from copper and zinc.
When deciding which type to use, consider your budget and the desired longevity of your artwork. Genuine gold leaf is the preferred choice for archival quality pieces, while imitation gold leaf is suitable for decorative projects where cost is a primary concern.
Materials Needed for Gold Leafing
Gathering the necessary materials is a critical first step. Here’s a list of what you’ll need:
- Acrylic Painting: Your completed or partially completed acrylic painting. Ensure the surface is clean and dry.
- Gold Leaf: Choose either genuine or imitation gold leaf depending on your project and budget.
- Gilding Adhesive (Size): A specialized adhesive designed for gold leaf application. Water-based sizes are generally preferred for acrylic paintings.
- Soft Brush: A wide, soft brush for applying the gilding adhesive.
- Gilder’s Tip: A thin, flat brush used to pick up and transfer delicate gold leaf sheets.
- Cotton Gloves: To prevent oils from your hands from damaging the gold leaf.
- Soft Cloth or Burnisher: For gently pressing the gold leaf onto the adhesive.
- Sealer: A clear acrylic sealer to protect the gold leaf from tarnishing and abrasion.
Step-by-Step Guide: Applying Gold Leaf to Acrylic Painting
Preparing Your Acrylic Painting
Before you begin, ensure your acrylic painting is completely dry. Any moisture can interfere with the adhesion of the gold leaf. Gently clean the surface with a soft, dry cloth to remove any dust or debris. If your painting has any texture, consider applying a thin layer of acrylic varnish to create a smoother surface for the gold leaf.
Applying the Gilding Adhesive
Using a soft brush, apply a thin, even layer of gilding adhesive to the areas where you want to apply the gold leaf. Be precise, as the gold leaf will only adhere to the areas covered with adhesive. Allow the adhesive to become tacky, following the manufacturer’s instructions. This typically takes between 15 minutes to an hour, depending on the type of adhesive and the ambient humidity. The adhesive is ready when it’s clear and slightly sticky to the touch. It’s crucial to understand that the success of how to apply gold leaf to acrylic painting largely depends on the correct application and tackiness of this adhesive.
Applying the Gold Leaf
Wearing cotton gloves, carefully pick up a sheet of gold leaf with the gilder’s tip. Gently position the gold leaf over the prepared area and lay it down, starting from one edge and working your way across. Avoid touching the gold leaf directly with your fingers, as the oils on your skin can damage it. Once the gold leaf is in place, gently press it onto the adhesive with a soft cloth or burnisher. Work in small sections, overlapping the gold leaf slightly to ensure complete coverage. This is a delicate stage, so patience and precision are key to how to apply gold leaf to acrylic painting.
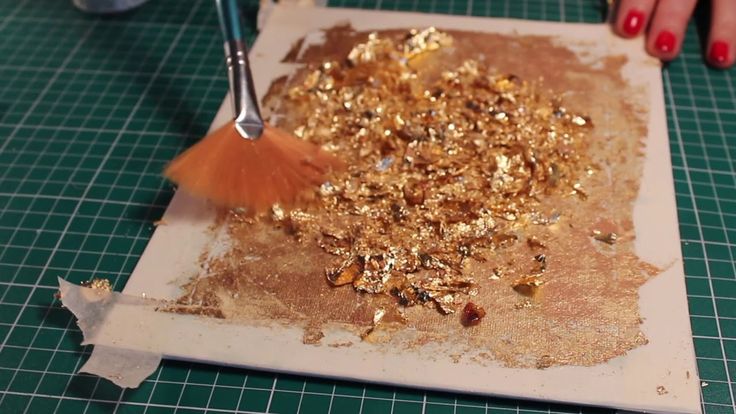
Removing Excess Gold Leaf
After the gold leaf has adhered to the adhesive, use a soft brush to gently sweep away any excess gold leaf. This process is often referred to as “skimming.” Collect the excess gold leaf for future use, as it can be used to fill in any gaps or imperfections. Be careful not to scratch or damage the applied gold leaf during this step.
Burnishing the Gold Leaf
Burnishing the gold leaf enhances its shine and creates a smooth, even surface. Use a soft cloth or burnisher to gently rub the gold leaf in a circular motion. This process helps to remove any air bubbles and ensures a strong bond between the gold leaf and the adhesive. Be careful not to apply too much pressure, as this can damage the delicate gold leaf. The burnishing stage is vital for achieving a professional finish when learning how to apply gold leaf to acrylic painting.
Sealing the Gold Leaf
Sealing the gold leaf is essential to protect it from tarnishing and abrasion, especially if you’re using imitation gold leaf. Apply a thin, even layer of clear acrylic sealer over the gold leaf using a soft brush. Allow the sealer to dry completely before handling the artwork. For added protection, you can apply multiple coats of sealer, allowing each coat to dry thoroughly before applying the next. This step is crucial for preserving the beauty and integrity of your work, especially when considering how to apply gold leaf to acrylic painting for long-term display.
Tips and Tricks for Successful Gold Leafing
- Work in a Clean Environment: Dust and debris can interfere with the adhesion of the gold leaf.
- Use a Light Touch: Gold leaf is extremely delicate, so handle it with care.
- Practice on Scrap Material: Before applying gold leaf to your artwork, practice on a piece of scrap material to get a feel for the process.
- Choose the Right Adhesive: Water-based adhesives are generally preferred for acrylic paintings, as they are less likely to damage the paint.
- Be Patient: Gold leafing can be a time-consuming process, so be patient and take your time.
- Proper Ventilation: Ensure adequate ventilation when working with sealers and adhesives.
Troubleshooting Common Issues
Even with careful preparation, you may encounter some common issues when applying gold leaf. Here are some solutions:
- Gold Leaf Not Adhering: The adhesive may not be tacky enough. Allow it to dry for a longer period of time, or apply another thin layer of adhesive.
- Uneven Coverage: Overlap the gold leaf sheets slightly to ensure complete coverage. Use small pieces of gold leaf to fill in any gaps or imperfections.
- Tarnishing: Seal the gold leaf with a clear acrylic sealer to protect it from tarnishing.
- Wrinkles or Bubbles: Gently burnish the gold leaf to remove any wrinkles or bubbles.
Advanced Techniques for Gold Leafing
Once you’ve mastered the basic techniques, you can explore some advanced techniques to add even more depth and dimension to your gold leafing. Consider using different colors of gold leaf, or combining gold leaf with other metallic leafing materials, such as silver or copper. You can also experiment with different textures and patterns by using stencils or masking techniques. These advanced techniques can elevate your understanding of how to apply gold leaf to acrylic painting to an entirely new level.
The Allure and Applications of Gold Leaf in Art
Gold leaf has been used in art for centuries, from ancient Egyptian artifacts to Byzantine mosaics. Its timeless appeal lies in its ability to capture and reflect light, creating a sense of radiance and luxury. In acrylic painting, gold leaf can be used to highlight specific areas, add texture, or create a focal point. It’s a versatile medium that can be incorporated into a wide range of artistic styles, from abstract expressionism to representational art. The history of gold leafing adds a layer of depth to understanding how to apply gold leaf to acrylic painting.
Understanding how to apply gold leaf to acrylic painting opens up a world of creative possibilities. By following these steps and tips, you can create stunning works of art that will be admired for years to come. Remember to practice patience, pay attention to detail, and experiment with different techniques to find your own unique style. The reflective beauty of gold leaf will undoubtedly enhance your acrylic paintings and bring a touch of elegance to your artistic endeavors. [See also: Acrylic Painting Techniques for Beginners]
Final Thoughts on Mastering Gold Leaf Application
Mastering how to apply gold leaf to acrylic painting is a journey that combines technical skill with artistic vision. The tips and techniques outlined in this guide provide a solid foundation for your exploration. Remember that each artwork is unique, and experimentation is key to discovering new and innovative ways to incorporate gold leaf into your paintings. Embrace the challenges, celebrate the successes, and continue to refine your craft. With dedication and practice, you’ll be able to create breathtaking pieces that showcase the beauty and timeless appeal of gold leaf. The ability to confidently and skillfully how to apply gold leaf to acrylic painting is a valuable asset for any artist.
