How to Clean a Carburetor on a Lawn Tractor: A Step-by-Step Guide
Maintaining your lawn tractor is crucial for ensuring its longevity and optimal performance. One of the most common issues that can affect a lawn tractor’s performance is a dirty carburetor. The carburetor is responsible for mixing air and fuel in the correct ratio to ensure proper combustion. Over time, the carburetor can become clogged with dirt, debris, and old fuel, leading to starting problems, rough idling, and reduced power. Learning how to clean a carburetor on a lawn tractor is an essential skill for any homeowner or lawn care professional.
This comprehensive guide will walk you through the process of cleaning a carburetor on your lawn tractor, step-by-step, providing you with the knowledge and confidence to tackle this task yourself. By following these instructions, you can save money on costly repairs and ensure your lawn tractor runs smoothly for years to come. We’ll cover everything from identifying the symptoms of a dirty carburetor to the tools you’ll need and the detailed cleaning process.
Why Cleaning Your Lawn Tractor Carburetor Matters
Before diving into the process, it’s essential to understand why cleaning a carburetor on your lawn tractor is so important. A dirty carburetor can lead to a variety of problems, including:
- Difficulty Starting: A clogged carburetor can prevent the engine from receiving the proper fuel mixture, making it difficult to start.
- Rough Idling: If the carburetor is not providing a consistent fuel supply, the engine may idle roughly or stall.
- Reduced Power: A dirty carburetor can restrict fuel flow, leading to a decrease in engine power and performance.
- Increased Fuel Consumption: When the carburetor is not functioning correctly, the engine may burn more fuel than necessary.
- Engine Damage: In severe cases, a dirty carburetor can lead to engine damage due to improper combustion.
Regularly cleaning your lawn tractor’s carburetor can prevent these issues and keep your machine running efficiently. [See also: Lawn Tractor Maintenance Schedule]
Identifying a Dirty Carburetor: Signs and Symptoms
Knowing the signs of a dirty carburetor can help you identify the problem early and prevent further damage. Here are some common symptoms:
- Hard Starting: The engine requires multiple attempts to start, especially after sitting for a while.
- Poor Performance: The engine lacks power, hesitates during acceleration, or stalls easily.
- Rough Idle: The engine idles unevenly or stalls when idling.
- Black Smoke: Excessive black smoke coming from the exhaust indicates a rich fuel mixture, often caused by a dirty carburetor.
- Fuel Leaks: Fuel leaking from the carburetor is a sign of a problem, which may be related to dirt or debris.
If you notice any of these symptoms, it’s time to consider cleaning the carburetor on your lawn tractor.
Tools and Materials You’ll Need
Before you begin, gather the necessary tools and materials:
- Socket Set: For removing bolts and nuts.
- Screwdrivers: Both flathead and Phillips head.
- Carburetor Cleaner: A specialized solvent designed to dissolve deposits and varnish.
- Small Brushes: For scrubbing and cleaning small parts.
- Compressed Air: To blow out debris from small openings.
- Safety Glasses: To protect your eyes from chemicals and debris.
- Gloves: To protect your hands from chemicals.
- Clean Rags: For wiping up spills and cleaning parts.
- Carburetor Rebuild Kit (Optional): If the carburetor is severely damaged or worn, a rebuild kit may be necessary.
- Fuel Stabilizer: To prevent future fuel-related issues.
Having these tools and materials on hand will make the carburetor cleaning process much smoother. [See also: Essential Lawn Tractor Tools]
Step-by-Step Guide: Cleaning Your Lawn Tractor Carburetor
Now, let’s get to the actual carburetor cleaning process:
Step 1: Disconnect the Spark Plug
Safety first! Disconnect the spark plug wire to prevent accidental starting. This is a crucial step to avoid injury.
Step 2: Locate the Carburetor
The carburetor is typically located between the air filter and the engine. Refer to your lawn tractor’s manual if you’re unsure of its exact location.
Step 3: Disconnect Fuel Lines and Linkages
Carefully disconnect the fuel lines from the carburetor. Use pliers to loosen the clamps if necessary. Be prepared for some fuel spillage, and have a rag ready to catch it. Also, disconnect any linkages connected to the carburetor, such as the throttle and choke cables. Take photos of the connections before disconnecting them to ensure you can reassemble them correctly later.
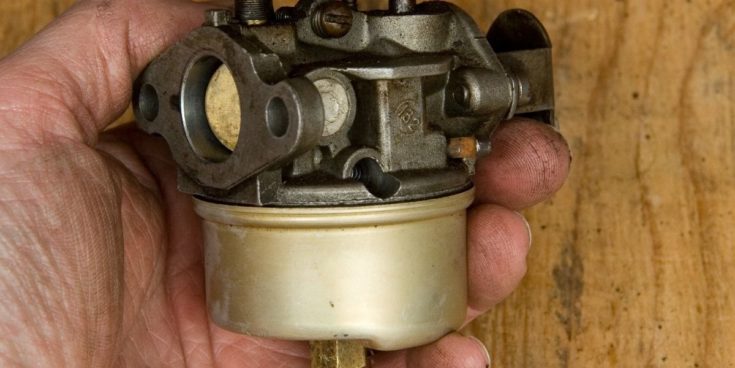
Step 4: Remove the Carburetor
Loosen and remove the bolts or nuts holding the carburetor in place. Gently pull the carburetor away from the engine. Be careful not to damage any gaskets or O-rings. If the carburetor is stuck, try gently wiggling it back and forth.
Step 5: Disassemble the Carburetor
Place the carburetor on a clean workbench. Carefully disassemble the carburetor, removing the float bowl, float, needle valve, and any other removable parts. Pay close attention to the order in which the parts are removed, and take pictures if necessary. Note the number of turns required to fully seat the fuel mixture screw. This information will be useful when reassembling the carburetor. [See also: Carburetor Troubleshooting Guide]
Step 6: Clean the Carburetor Parts
Spray all the carburetor parts with carburetor cleaner. Use small brushes to scrub away any dirt, varnish, or deposits. Pay close attention to the jets and small openings, as these are the most likely areas to become clogged. Use compressed air to blow out any remaining debris. Be sure to wear safety glasses to protect your eyes from flying debris.
Step 7: Inspect and Replace Worn Parts
Inspect all the carburetor parts for wear or damage. Replace any worn or damaged parts, such as gaskets, O-rings, or the needle valve. A carburetor rebuild kit can be a convenient way to replace multiple parts at once.
Step 8: Reassemble the Carburetor
Reassemble the carburetor in the reverse order of disassembly. Make sure all the parts are properly seated and tightened. Refer to the photos you took earlier to ensure everything is reassembled correctly. Reinstall the fuel mixture screw, turning it in until it is lightly seated, then back it out the number of turns you noted during disassembly.
Step 9: Reinstall the Carburetor
Reinstall the carburetor onto the engine, making sure to align it properly. Tighten the bolts or nuts holding the carburetor in place. Reconnect the fuel lines and linkages, ensuring they are securely fastened. Double-check all connections to prevent leaks.
Step 10: Reconnect the Spark Plug
Reconnect the spark plug wire.
Step 11: Start the Engine
Turn on the fuel and start the engine. It may take a few attempts to start, as the fuel lines need to be primed. Once the engine starts, let it run for a few minutes to warm up. Adjust the idle speed and fuel mixture screw as needed to achieve a smooth idle.
Preventative Maintenance: Keeping Your Carburetor Clean
After successfully cleaning your lawn tractor’s carburetor, it’s important to take steps to prevent future build-up of dirt and debris. Here are some tips:
- Use Fresh Fuel: Old fuel can break down and leave deposits in the carburetor. Always use fresh fuel, and avoid storing fuel for extended periods.
- Add Fuel Stabilizer: Fuel stabilizer can help prevent fuel from breaking down and forming deposits. Add fuel stabilizer to your fuel tank, especially when storing your lawn tractor for the off-season.
- Regularly Inspect and Clean the Air Filter: A dirty air filter can allow dirt and debris to enter the carburetor. Regularly inspect and clean the air filter, and replace it when necessary.
- Run the Engine Regularly: Running the engine regularly can help prevent fuel from stagnating and forming deposits. Start your lawn tractor at least once a month, even during the off-season.
By following these preventative maintenance tips, you can keep your lawn tractor’s carburetor clean and prevent future problems.
Troubleshooting Common Carburetor Problems
Even after cleaning the carburetor, you may still experience some issues. Here are some common problems and their solutions:
- Engine Still Won’t Start: Check the spark plug, fuel lines, and fuel filter. Make sure the fuel is fresh and the fuel lines are not clogged.
- Engine Runs Rough: Adjust the idle speed and fuel mixture screw. Check for air leaks around the carburetor.
- Engine Stalls: Clean the carburetor again, paying close attention to the jets and small openings. Check the fuel pump and fuel filter.
- Fuel Leaks: Inspect the fuel lines and connections for leaks. Replace any damaged fuel lines or fittings.
When to Seek Professional Help
If you’ve tried cleaning the carburetor and troubleshooting the problem, but your lawn tractor still isn’t running correctly, it may be time to seek professional help. A qualified mechanic can diagnose and repair more complex carburetor issues.
Conclusion
Cleaning a carburetor on your lawn tractor is a straightforward process that can significantly improve its performance and longevity. By following this step-by-step guide and implementing preventative maintenance practices, you can keep your lawn tractor running smoothly for years to come. Remember to always prioritize safety and take your time to ensure the job is done correctly. With a little effort, you can save money on costly repairs and enjoy a well-maintained lawn tractor. Now that you know how to clean a carburetor on a lawn tractor, you’re well-equipped to keep your machine running at its best.
